If you’ve made it to this page, you likely are considering painting your cabinets. My first recommendation to you would be this – plan to spend a LONG weekend at the very least! If you read my oak kitchen renovation post, you know my original plan was to use milk paint, sans primer. Y ou also know, this didn’t end up working for me as the oak wood grain on my cabinets was too intense! I first attempted to spray the milk paint – fail. I then brushed ALL OF THE CABINETS – fail again. I suppose I could have lived with it, but I hated the oak grain showing through. For that reason, it took me quite a bit longer than it should have. Hopefully you can streamline your process using these tips. Please note, I don’t claim to be a professional by any means. This is just what worked for me.
You will need:
- 150 grit sandpaper
- Primer
- Paint
- Wood filler (I used Timbermate white oak)
- Tsp and or blue liquid dawn
- Trim brushes and rollers or paint sprayer
- Painters tape
- Paint Tarps
- Drill or screwdriver to remove cabinet doors
- Mask
- Rubber Gloves
Here’s what I suggest:
- Clean cabinets thoroughly! I used a solution of water and original blue dawn for most of the cabinets. For the really grimy areas, TSP liquid replacement cut through the best. Just follow the mixing directions on the bottle.
- Remove hardware and doors
- The original hardware was strangely high on the drawers, so I chose to fill the holes with wood filler. It took two coats with sanding in between to cover them fully. You likely won’t need to take this step.

- De-gloss. I did a quick degloss on everything. It’s potent, so plan accordingly.
- Sand! Others say it’s not necessary, but my feeling was, we are going to keep these cabinets for quite awhile so why not spend an extra hour?
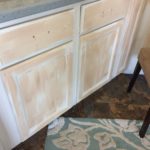
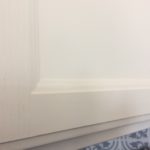
- Lots of Oak? Fill in the grain – It took me two 8 oz jars of Timbermate white oak wood filler. It’s non-toxic, but stinky, so I’d do it all outside if I did it again. I diluted it in a bowl to the consistency of cake batter and painted it on. I let it dry about 3 hours before sanding outside with 150 grit sandpaper. It’s a little hard to see in the photo but if you look close, you can see the grain showing through in the before photo to the right.
- PRIME! Since I’d already painted all of the cabinets with the milk paint I skipped this. But I would’t recommend not priming otherwise.
- Down to business! Painting… I ended up using Clark & Kensington Premium satin paint and primer in the color “Four Winds.” I love this color. It’s not white; It’s not gray; It’s not yellow; It’s perfect. I sprayed two coats using this Wagner Sprayer instead of brushing or rolling to avoid brush marks and drips.
- I started out with sliver knobs and bars, and decided I didn’t like them. So I took a risk and ordered my hardware off Amazon sight-unseen. I love it. It was way cheaper and it’s still quality! The brand is Cosmas.

And that’s it! I can’t say this was an easy task, but I don’t think there is a way to easily paint cabinets. I am really pleased with how they turned out and excited to have my white kitchen at long last!


[…] 2: THE CABINETS It took a year of being in our home before I finally got up the courage to paint our oak cabinets! […]